Deploy your Django project
In this story we will go over deployment of your Django project from A to Z. Prerequisites for this are that you are somewhat familiar with Django,
maybe you already started a Django project and would like to publish it on the world wide web or are about to start your project.
I am writing this tutorial because I know how frustrating it can be to deploy your website on any production server and have learnt some valuable tips along the way how to maintain the process.
I chose to host my website on Digitalocean. They are cheap, I'm using their $5 a month plan, and they serve Ubuntu. This tutorial will in part be based on their service.
Django project structure
It is important that you set up your Django project in a way so that you can work on it locally and serve that code on your production server.
Things to consider at this point are the dependencies, your Django project structure, version control, configurations, logging, and Django's settings.py.
Please note that anything between brackets like so
dependencies
These dependencies can be saved in a
Django==4.0.3
gunicorn==20.1.0
dj-database-url==0.5.0
psycopg2-binary==2.9.3
PyYAML==6.0
WhiteNoise==6.2.0
project structure
Using Github's/Azure version control system, we can ensure that the code in our local development and our production server is the same.
Create a Github or Azure repository named [projectname] and include the
In this folder you can create the Django project with [projectname] using Django's django-admin
This will auto-create the Django necessary files. You can start an application in this project using
If you're new to Django, please read their documentation first.
├── [projectname]/
│   ├── [projectname]/
│       ├── [appname]/
│       │   ├── migration/
│       │   ├── templates/
│       │   ├── __init__.py
│       │   ├── admin.py
│       │   ├── apps.py
│       │   ├── models.py
│       │   ├── tests.py
│       │   ├── urls.py
│       │   ├── views.py
│       ├── [projectname]/
│       │   ├── __init__.py
│       │   ├── asgi.py
│       │   ├── settings.py
│       │   ├── urls.py
│       │   ├── wsgi.py
│       ├── var/
│       │   ├── log/
│           │   ├── django.log
│       ├── __init__.py
│       ├── db.sqlite3
│       ├── manage.py
│       ├── requirements.txt
│       └── setup.py
├── conf/
│   ├── local_config.yml
├── .gitignore
├── README.md
Our
/conf/*
[projectname]/static/*
[projectname]/*/migrations/*
Django along with many other applications uses configurations settings such as the SECRET_KEY. We do not want to save these in our project, as we don't want to leak these.
There's several options to save configurations, the main being saving them in the environment variables of your local machine and your production server.
In this tutorial we're *not* going to do that for one specific reason: On our production server we will use gunicorn workers to serve the website 24/7, these workers do not have access to the environment variables, and I have yet been unable to feed them the environment variables.
Instead, what we'll be doing is saving the SECRET_KEYS in a configurations file. Previously, I worked with JSON for static configurations files, but I see the industry moving towards the more readable YAML configurations file.
Configurations
We're going to maintain two configurations file: one for local development and one for our production server.
local_config.yml
SECRET_KEY:
  "[your_django_project_secret_key]"
DEBUG:
  True
DEVELOPMENT_MODE:
  True
ALLOWED_HOSTS:
  ["127.0.0.1", "localhost"]
DATABASE:
  "ENGINE": "django.db.backends.sqlite3"
  "NAME": "[absolute_path_to_your_db.sqlit3_file]"
production_config.yml
SECRET_KEY:
  "[your_django_project_secret_key]"
DEBUG:
  False
DEVELOPMENT_MODE:
  False
ALLOWED_HOSTS:
    ["louisdebruijn.com", "www.louisdebruijn.com", "104.248.192.251", "2a03:b0c0:2:d0::11f5:c001"]
DATABASE:
  "ENGINE": "django.db.backends.postgresql_psycopg2"
  "NAME": ""
  "USER": ""
  "PASSWORD": ""
  "HOST": "localhost"
  "PORT": ""
In our production configurations under
We're using a local
Better static files management
Make sure to add WhiteNoise to the settings.py.
Last but not least we are going to adapt Django's
settings.py
from pathlib import Path
import sys
import yaml
import os

# Build paths inside the project like this: BASE_DIR / 'subdir'.
BASE_DIR = Path(__file__).resolve().parent.parent

# Load configurations from environment variable
if sys.platform == "darwin":
    CONF_DIR = BASE_DIR.parent / 'conf'
    path = CONF_DIR / "local_config.yml"
else:
    CONF_DIR = "/etc/conf"
    path = os.path.join(CONF_DIR, "production_config.yml")

with open(f"{path}") as stream:
    config = yaml.safe_load(stream)

...

INSTALLED_APPS = [
    'whitenoise.runserver_nostatic',
    ...

...

# Quick-start development settings - unsuitable for production
# See https://docs.djangoproject.com/en/4.0/howto/deployment/checklist/
DEBUG = config['DEBUG']
SECRET_KEY = config['SECRET_KEY']
ALLOWED_HOSTS = config['ALLOWED_HOSTS']

...

MIDDLEWARE = [
    # ...
    "django.middleware.security.SecurityMiddleware",
    "whitenoise.middleware.WhiteNoiseMiddleware",
    # ...
]

...

# Database
# https://docs.djangoproject.com/en/4.0/ref/settings/#databases
DEVELOPMENT_MODE = os.getenv("DEVELOPMENT_MODE", "False") == "True"

if DEVELOPMENT_MODE is True:
    DATABASES = {
        'default': config['DATABASE']
    }
elif len(sys.argv) > 0 and sys.argv[1] != 'collectstatic':
    DATABASES = {
        'default': config['DATABASE']
    }

...

# Static files (CSS, JavaScript, Images)
# https://docs.djangoproject.com/en/4.0/howto/static-files/
STATIC_URL = '/static/'
STATIC_ROOT = BASE_DIR / 'static/'

MEDIA_URL = '/media/'
MEDIA_ROOT = BASE_DIR / 'media/'

STATICFILES_STORAGE = 'whitenoise.storage.CompressedStaticFilesStorage'

...

# Logging configurations
LOGGING = {
    "version": 1,
    "disable_existing_loggers": False,
    "root": {"level": "INFO", "handlers": ["file"]},
    "handlers": {
        "file": {
            "level": "INFO",
            "class": "logging.FileHandler",
            "filename": f"{BASE_DIR}/var/log/django.log",
            "formatter": "app",
        },
    },
    "loggers": {
        "django": {
            "handlers": ["file"],
            "level": "INFO",
            "propagate": True
        },
    },
    "formatters": {
        "app": {
            "format": (
                u"%(asctime)s [%(levelname)-8s] "
                "(%(module)s.%(funcName)s) %(message)s"
            ),
            "datefmt": "%Y-%m-%d %H:%M:%S",
        },
    },
}
These
When working with production servers it is important to also consider logging. In local development you might be tempted to
Push your changes to your repository, making sure that you do not upload the
Digitalocean Droplet
For hosting our Django project I chose Digitalocean because they are cheap (I am on their 5$ a month plan). They have good documentation, have Linux based virtual machines (servers) and their interface is great.
You can sign up on their website using the link below and create an account. You will first have to create a project, which I conveniently named
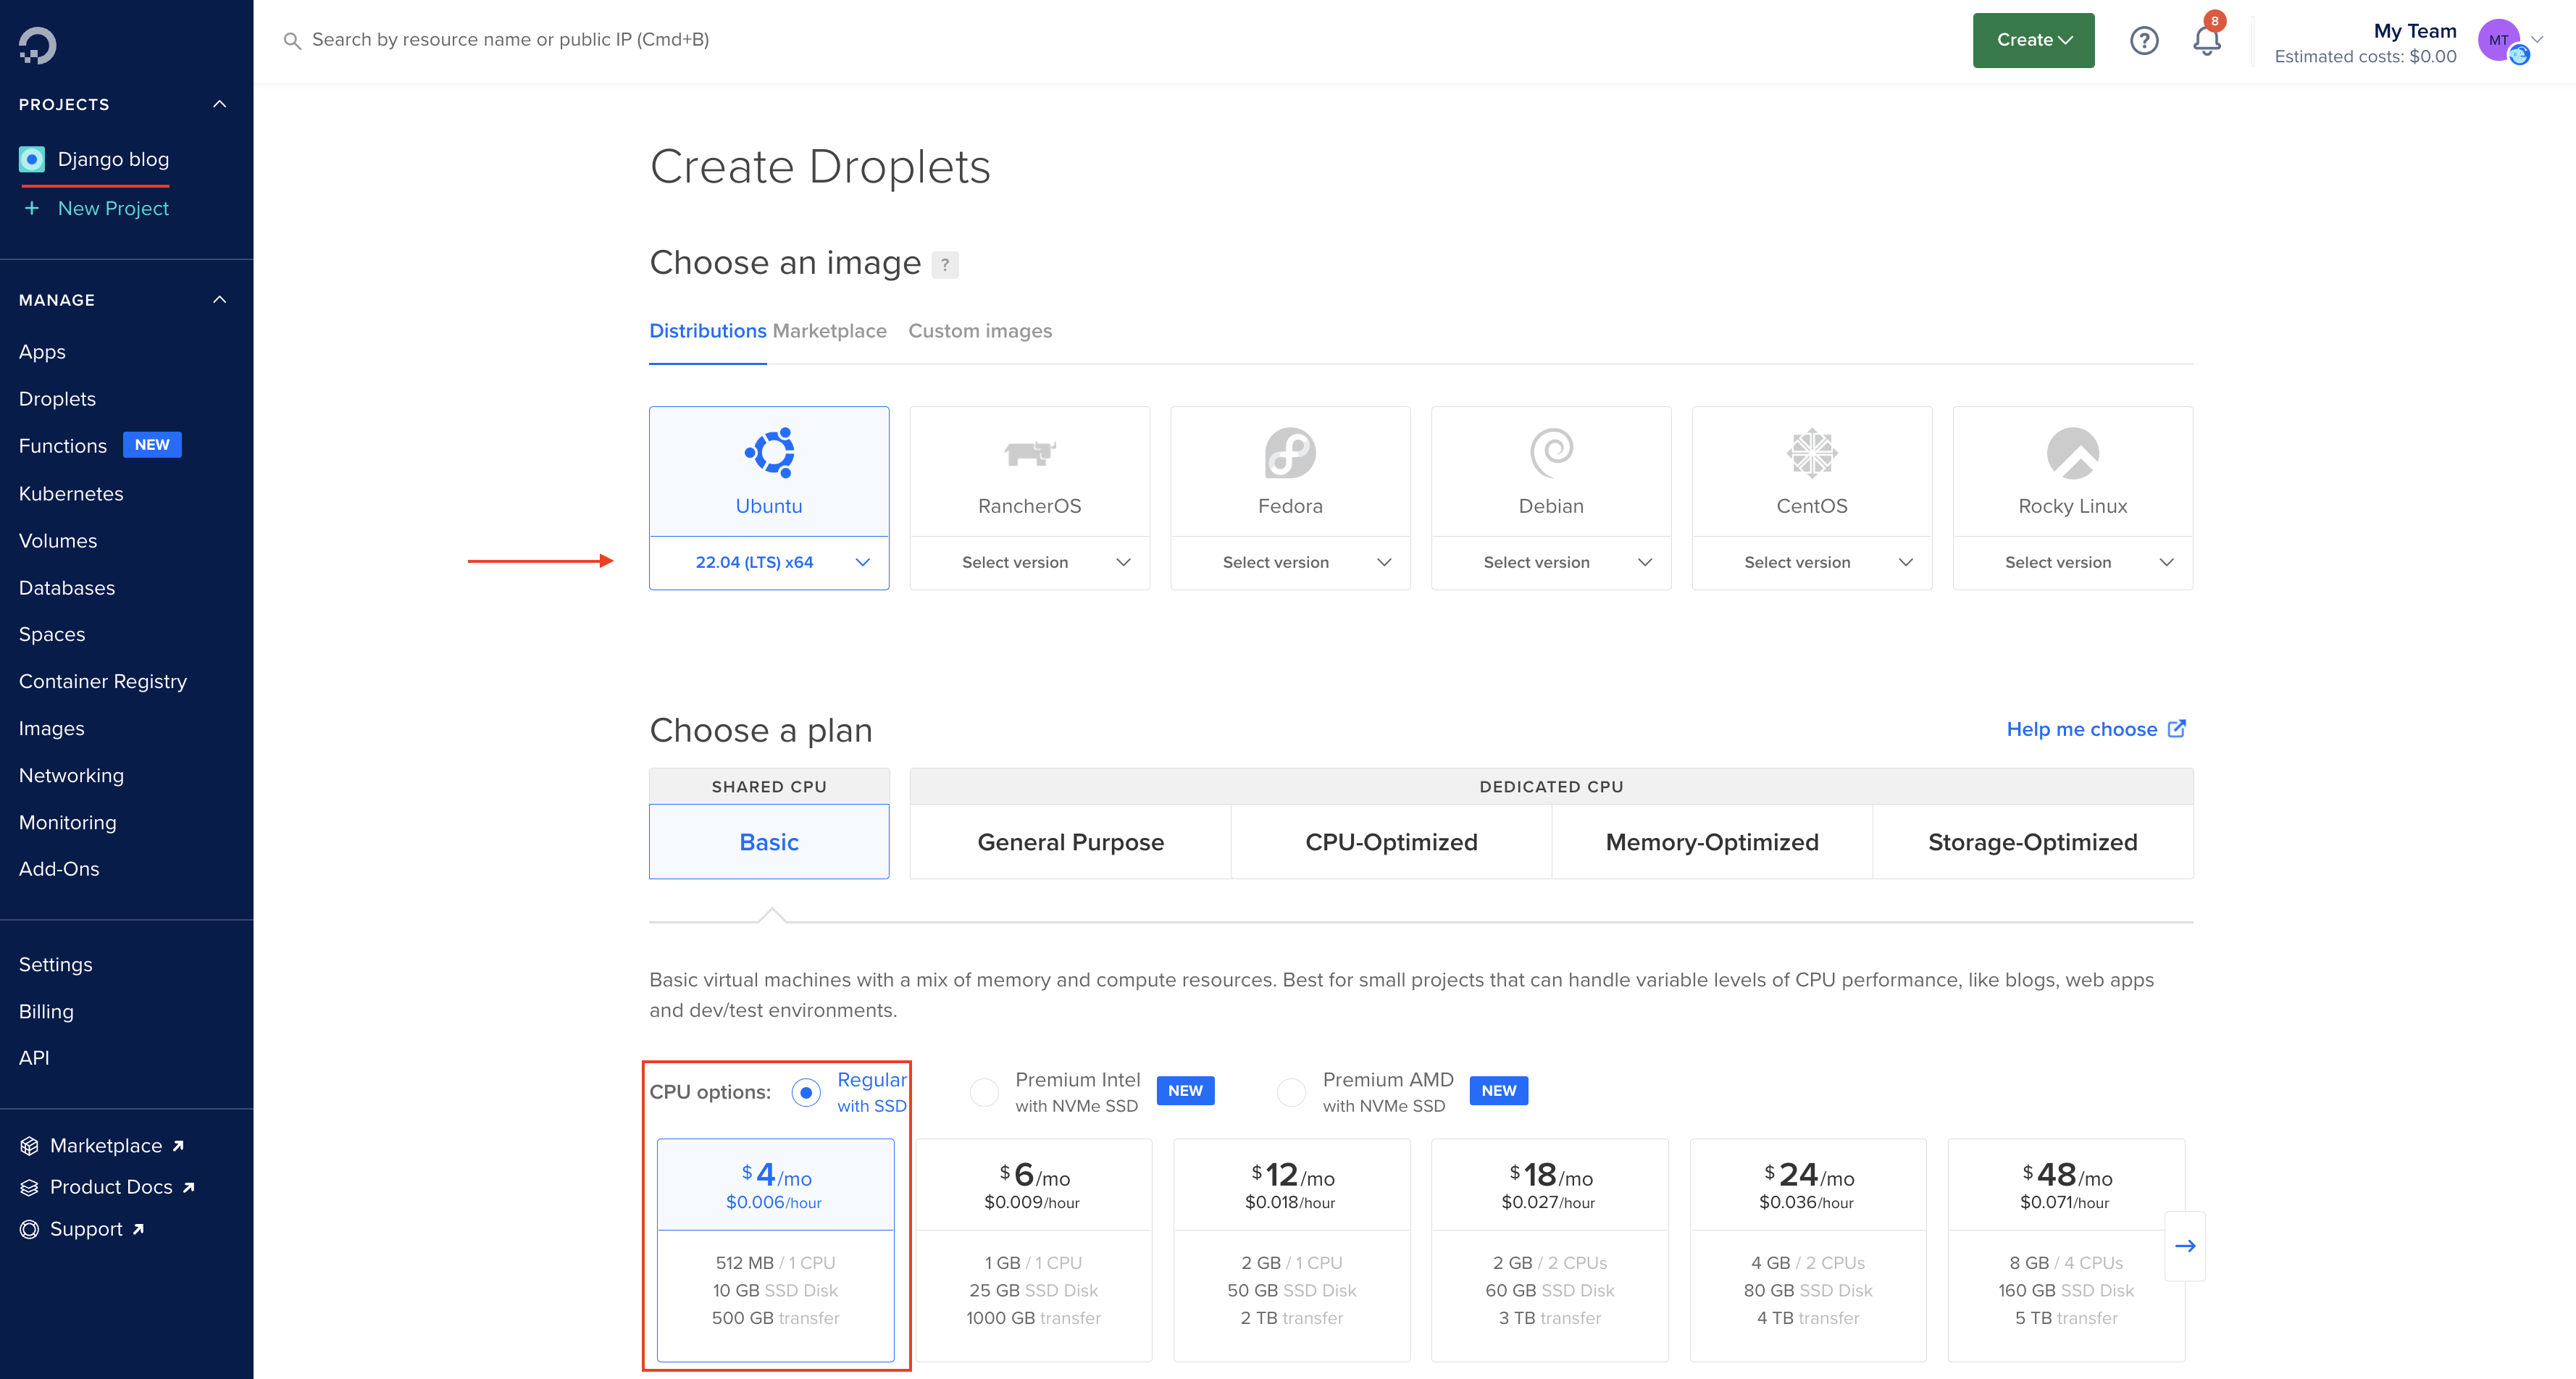
Indicated by the red arrow in the image below you can choose your Ubuntu server, let's choose 22.04. Make sure you click on their CPU options under "Regular with SSD" plan to see their cheapest plan.
You can later upgrade your droplet if your server needs more power, but for now let's choose the cheapest option. Scrolling down on the Droplet creation page you can choose the datacenter region and your authentication method to the droplet either via root password or SSH keys.
Give your droplet a name, add it to your previously created Digitalocean project, and you're good to go!
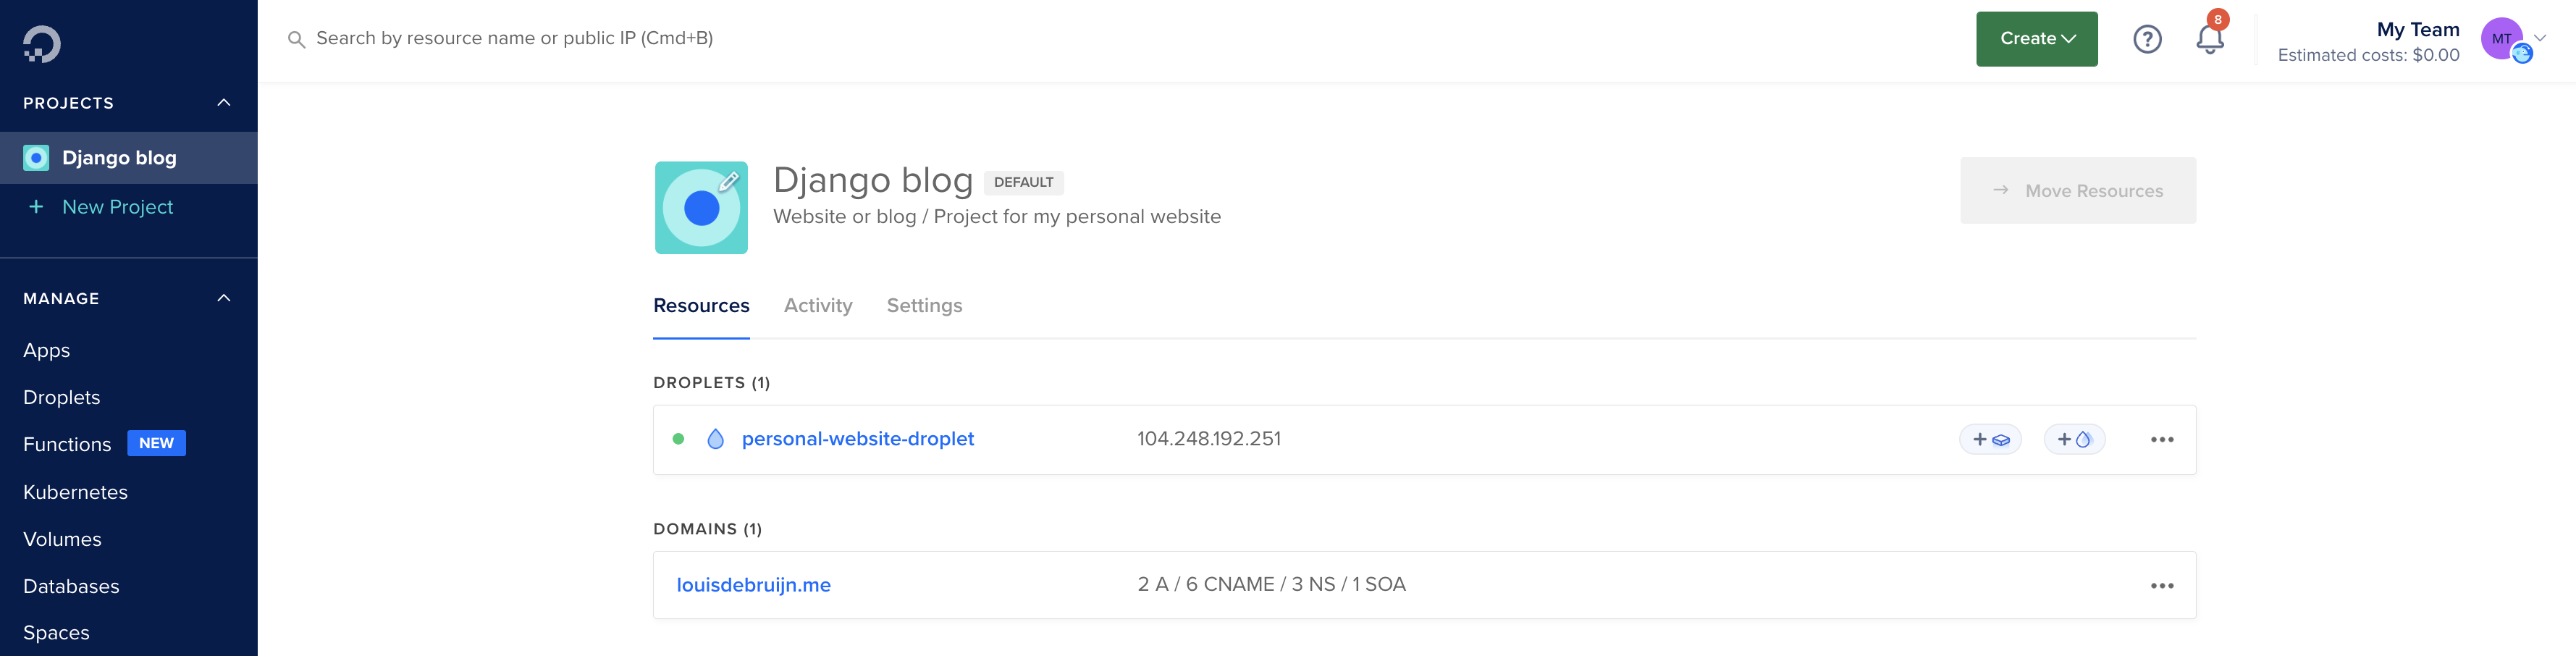
Now that you have created your first droplet, you should be able to see it in your project like the image below. You probably will not see the domains header yet, as we have not yet added domains to your Digitalocean project.
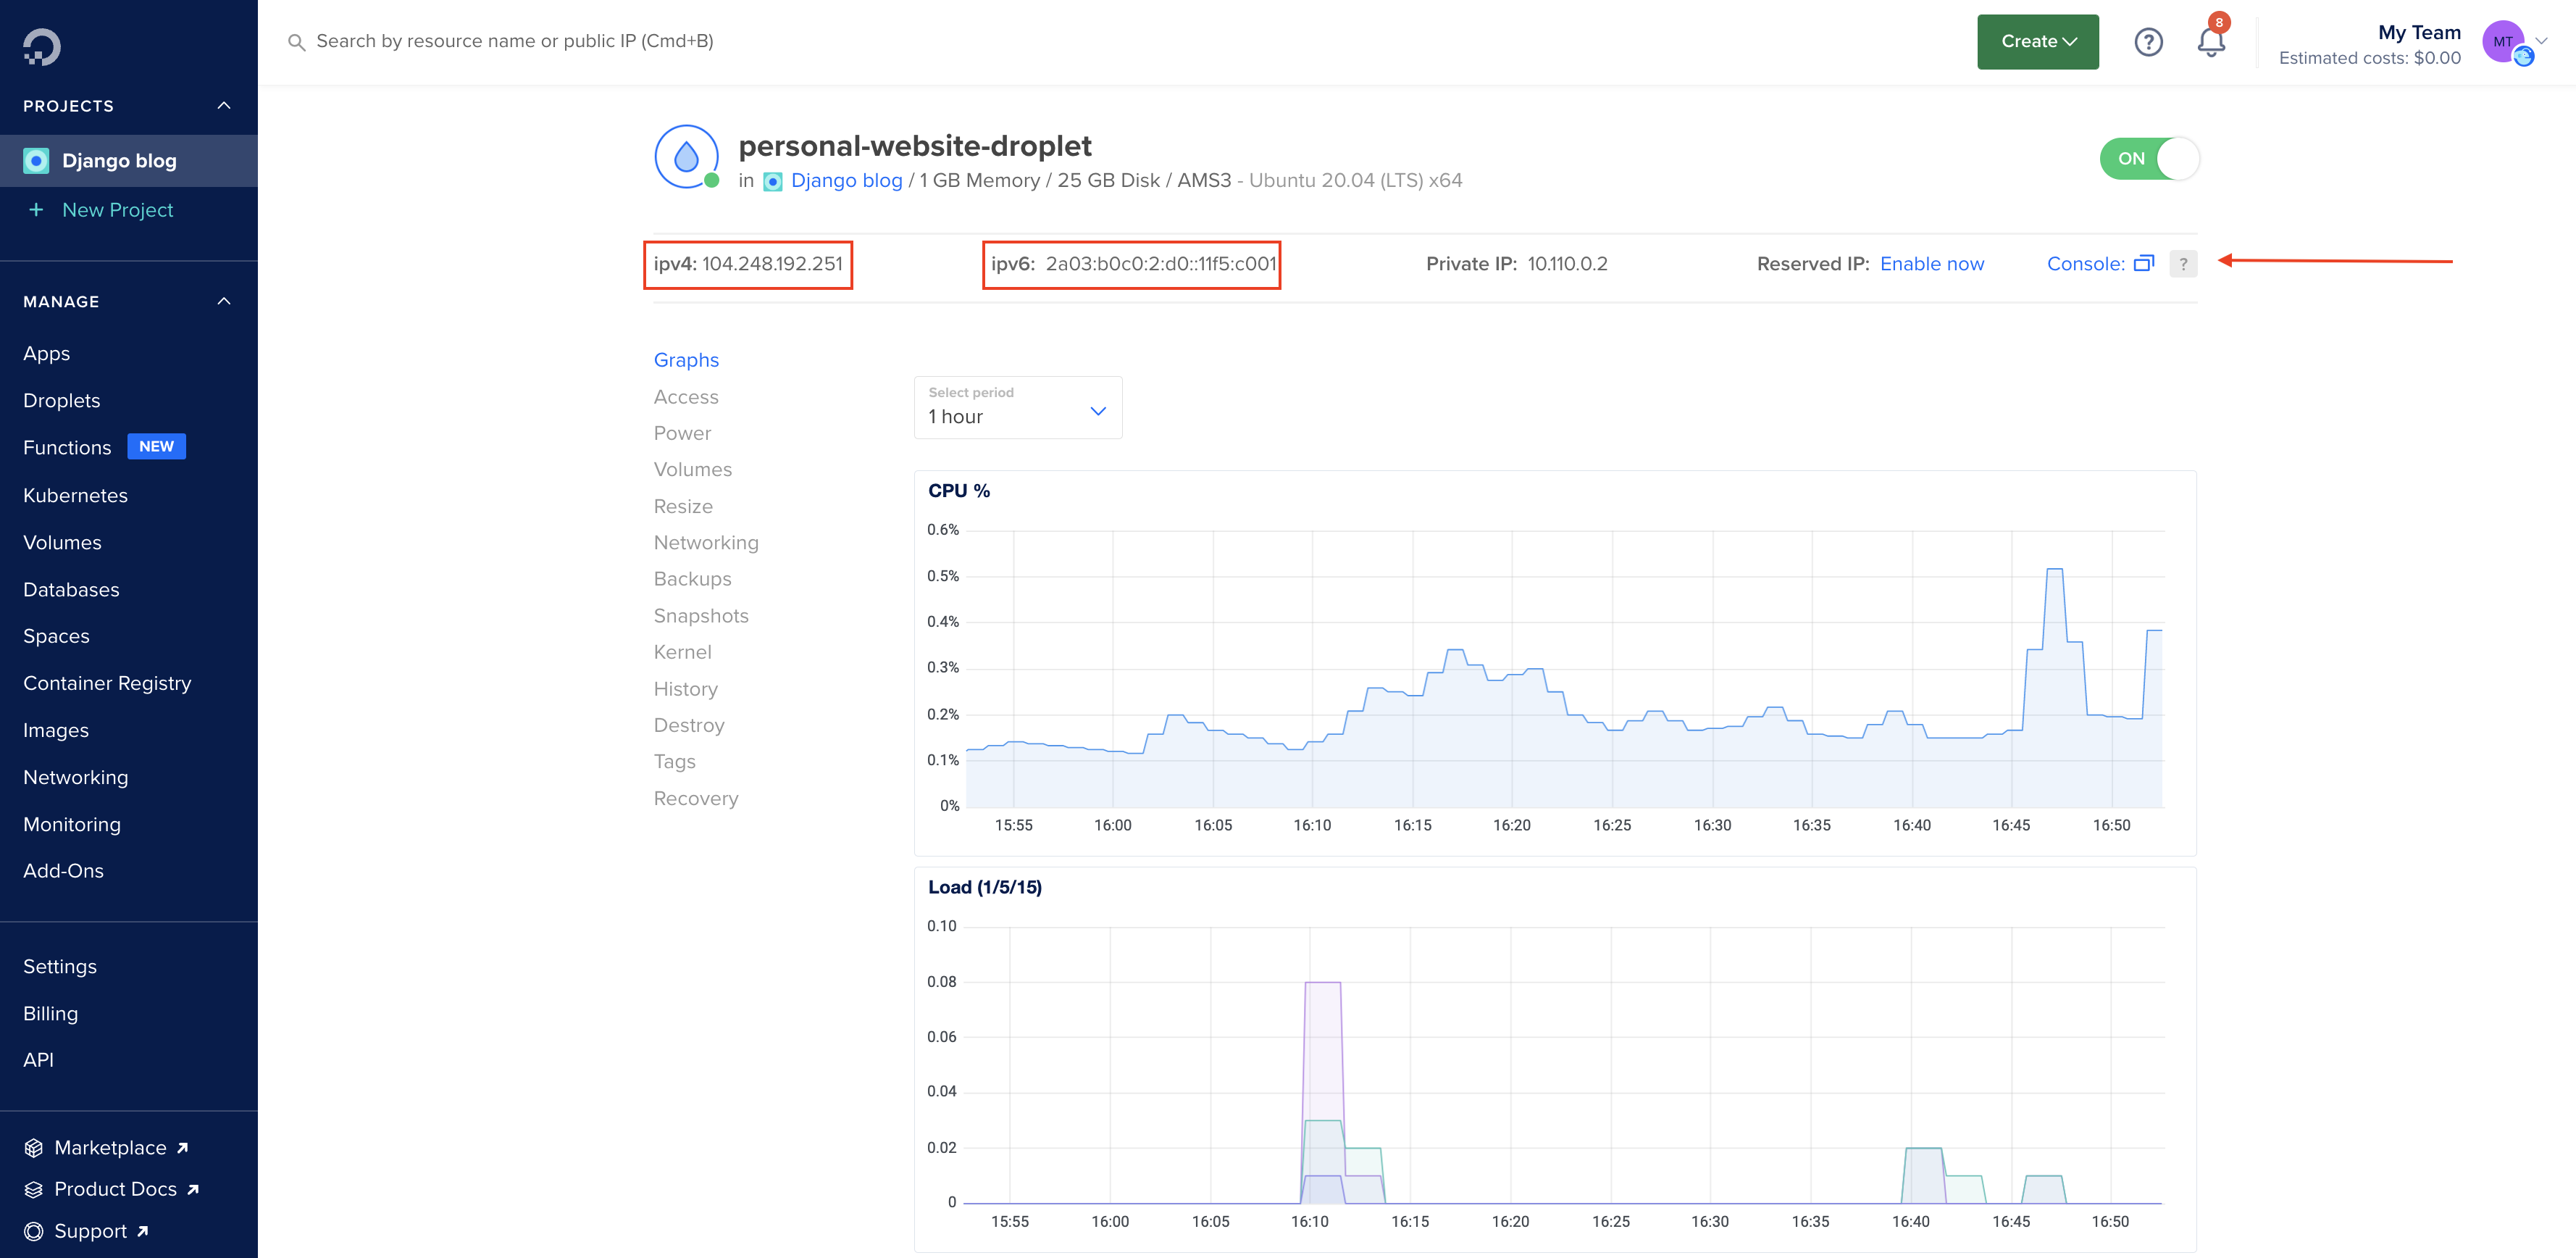
If you click on your droplet you will see the droplet's landing page as shown in the image below. In the two red boxes we can find the server's IPV4 and IPV6 address, that we include in our
Ok! We're about 1/3 on our way. Next up we're going to follow the first of three tutorials by Digitalocean to set up our server.
(1) Initial server setup
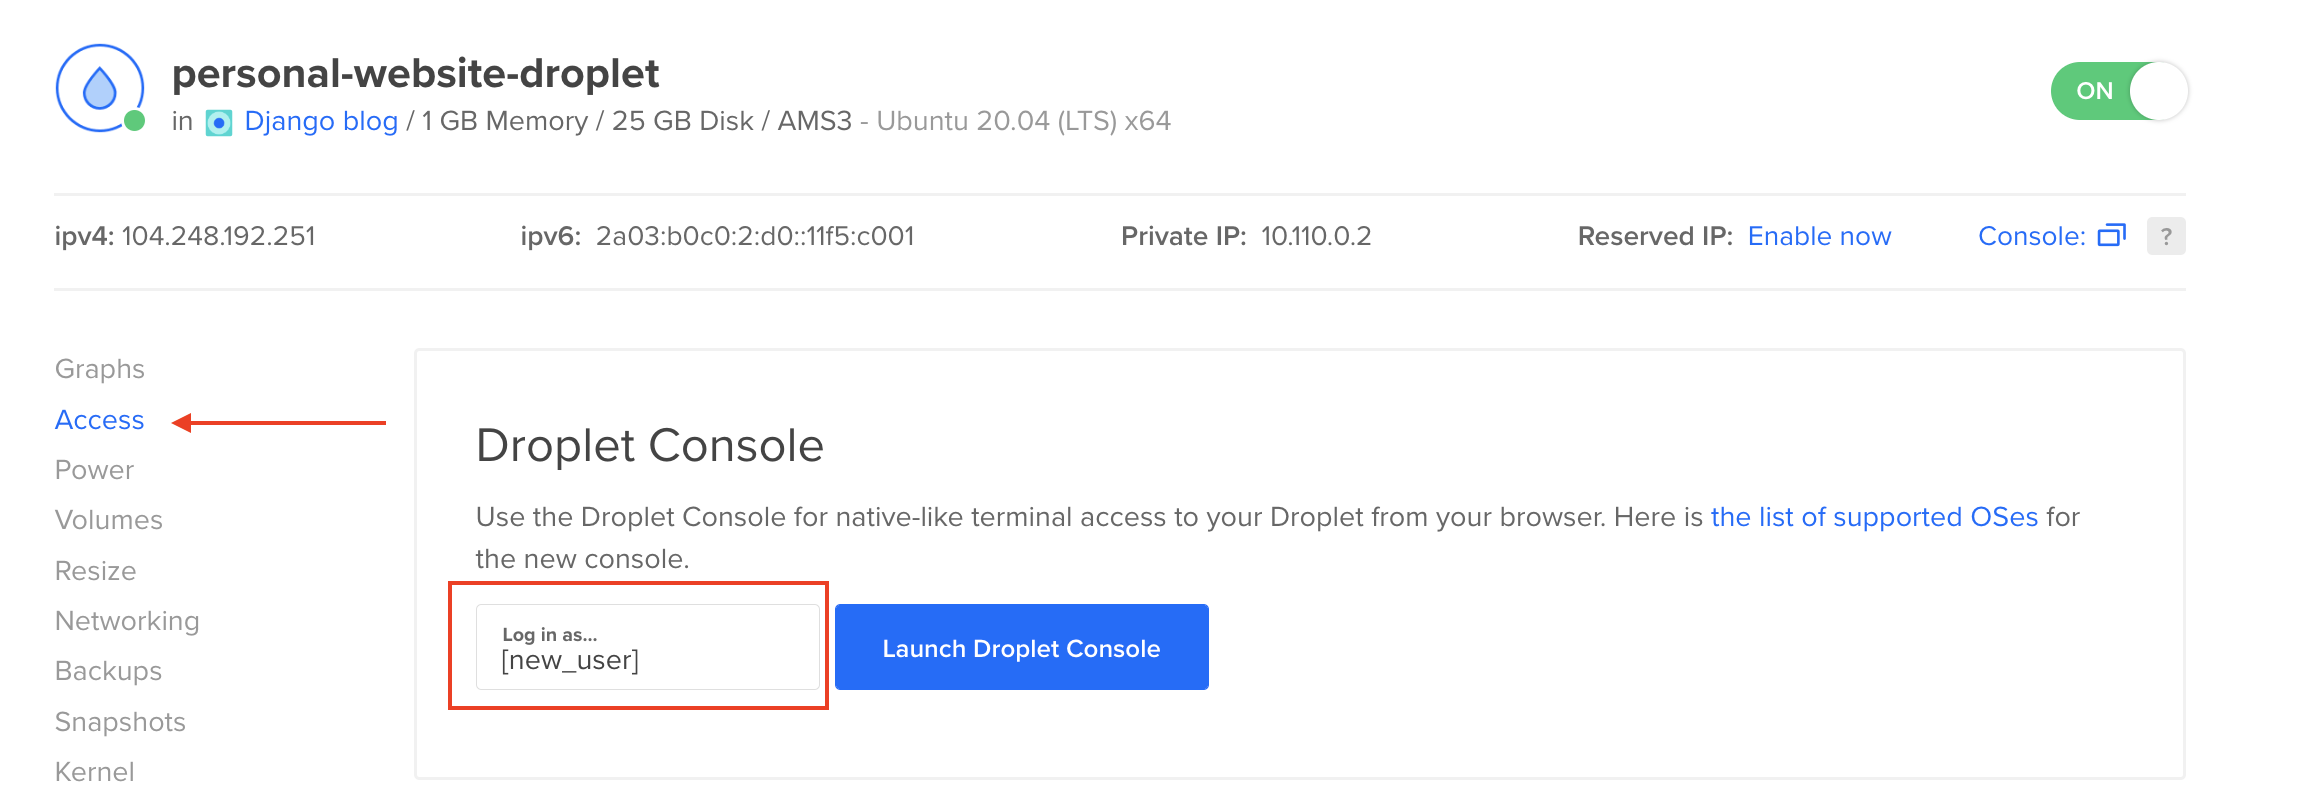
First we need to create a new user with sudo privileges other than the
After creating of this new user, we can log in to the console via the "Access" tab in our droplet as shown below.
Personal Access Token
After logging in to our server's console with our newly created user, we can pull our repository from Github/Azure.
To pull our repository we're going to need to create a Personal Access Token (PAT) and use that as our password.
Having created the PAT, please go in the home/[user_name] folder (this is where you start in the console terminal) and
To avoid having to fill in the PAT everytime we want to pull the latest changes, let's adjust our
~/.gitconfig
[user]
        name = [your_github_user_name]
        email = [your_github_email_address]
        password = [your_PAT]
[credential]
        helper = store
Databases
Databases are a great abstraction to keep your data outside the code base of your Django, but they can make things seemingly difficult.
Currently, we have a database on our local machine (Sqlite3) and are about to create a database on our production server (PostgresSQL).
There's two approaches you could follow now.
1) We can maintain both databases and do a single data dump of our local database and import that into our production database.
2) We can use an external database and use the python package
For now we're going to follow the 1st approach. Please follow the first part of the next tutorial by Digitalocean until the header "Creating a Python Virtual Environment for your Project".
(2) Setting up the PostgresSQL database
After creating our PostgresSQL database on our production server, let's make sure we fill the NAME, USER, PASSWORD and HOST in our database configurations in our
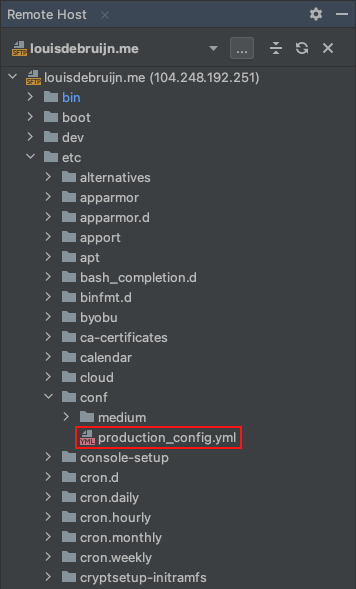
In order to copy the production configurations file to our
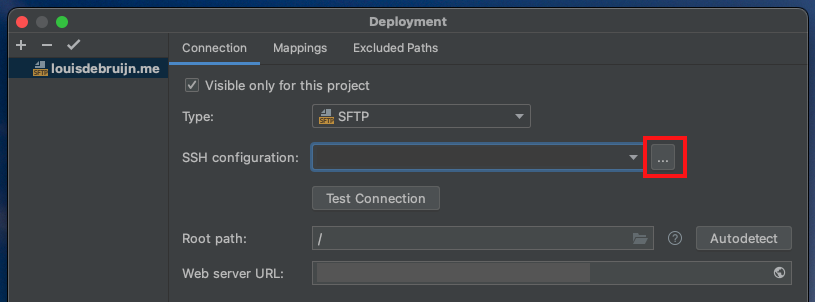
SFTP connection with PyCharm
Here I am going to show you how to do this with the PyCharm IDE, but feel free to use other services like Cyberduck or other SFTP/FTP clients.
Under Tools > Deployment > Configurations you can set up a new SFTP connection. Click on the three dots as shown in the image below and a new window will pop up where you can fill out the SSH connection.
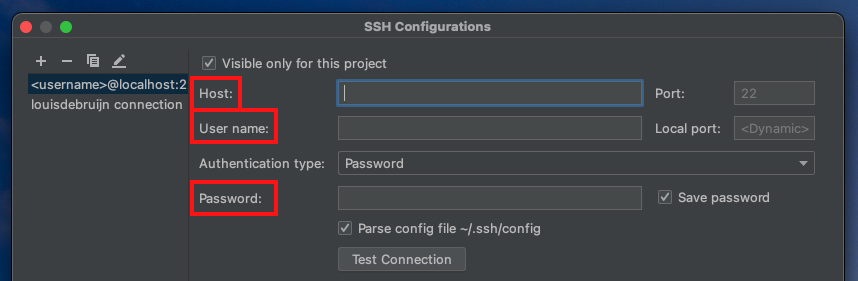
Set up a new SSH connection and fill out the HOST, USERNAME and PASSWORD. The port autofill to 22. Click on Apply.
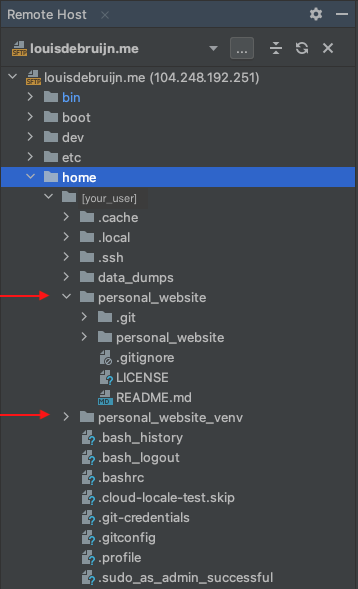
Click on Apply and Under Tools > Deployment > Browse Remote Host and a new window should pop up. You will see the project structure on your remote server (left image below).
You might want to add the other user's rights for this folder, if you want to make changes to the production_config.yml
Create a new folder
Drag and drop our
Database dump & load
Now that we have our SFTP connection, and we have copied the
And load it with the following command in our production server
Do this for all of your Django apps to have your local database data on your production server.
Mind you, that when you add new data on your production server it will not automatically be in your local machine or vice versa.
You might have to repeat this process if you want to synchronise the databases or opt for option 2).
If you ran into issues with migrations, you can empty the database table for a specific app with the following commands
Here's also some other useful commands for omitting previous migrations and checking your db
Last, a command to reboot your database table. Remove the
Production server's virtual environment
Now that we have our production configurations in place we can set up the virtual environment on our production server. Use the Digitalocean console and login with the SSH user you've created earlier.
venv
Create your virtual environment on the level of your Github repository, next to the [projectname] folder with your Django project inside. For reference please look at the left image above. The first arrow indicates the Django project and the second arrow your virtual environment.
If your environment is active, the prompt should show [myprojectenv]. We can now install our
Let's migrate our database and create an admin superuser for the admin page using Django's manage.py
If you followed the initial server setup guide from the Digitalocean tutorial (1), you should have a UFW firewall protecting your server. In order to test the development server, you need to allow access to the port you’ll be using.
Your Django project should now be able to run.
Visit the web domain
Serving website 24/7
Nice! We're 2/3 done. You might feel a bit in over your head. To be honest, it took me a full day to figure this stuff out.
After we've installed all our dependencies in our virtual environment it is time to use Gunicorn and Nginx to serve our website 24/7. Please follow the rest of the Digitalocean tutorial.
(2) Serving your website
Please be sure to check out the Digitalocean tutorial. There are many commands for troubleshooting. The folder location for the Gunicorn files is gunicorn.socket, gunicorn.service and sites-available/louisdebruijn.com contain. I've masked my username with
gunicorn.socket
[Unit]
Description=gunicorn socket

[Socket]
ListenStream=/run/gunicorn.sock

[Install]
WantedBy=sockets.target
gunicorn.service
[Unit]
Description=gunicorn daemon
Requires=gunicorn.socket
After=network.target

[Service]
User=[***]
Group=www-data
WorkingDirectory=/home/[***]/personal_website/personal_website
ExecStart=/home/[***]/personal_website_venv/bin/gunicorn \
          --access-logfile - \
          --workers 3 \
          --bind unix:/run/gunicorn.sock \
          personal_website.wsgi:application

[Install]
WantedBy=multi-user.target
sites-available/louisdebruijn.com
server {
    listen 80;
    server_name 104.248.192.251 louisdebruijn.com www.louisdebruijn.com;

    location = /favicon.ico { access_log off; log_not_found off; }
    location /static/ {
        root /home/[***]/personal_website/personal_website;
    }

    location / {
        include proxy_params;
        proxy_pass http://unix:/run/gunicorn.sock;
    }
}
This command is relevant for restarting the service
And a chain of commands for the process of setting up your Gunicorn
Digitalocean also has a tutorial on Nginx, which is helpful to get familiarized.
Multiple domains
If you want to add or redirect more domains, you can do so by adding another domain to your
Please find below my
sites-available/louisdebruijn.me
    server {
          server_name louisdebruijn.me www.louisdebruijn.me;

          rewrite ^/(.*)$ http://louisdebruijn.com/$1 permanent;

          location = /favicon.ico { access_log off; log_not_found off; }
          location /static/ {
              root /home/leddebruijn/personal_website/personal_website;
          }

          location / {
              include proxy_params;
              proxy_pass http://unix:/run/gunicorn.sock;
          }

        listen 443 ssl; # managed by Certbot
        ssl_certificate /etc/letsencrypt/live/louisdebruijn.me/fullchain.pem; # managed by Certbot
        ssl_certificate_key /etc/letsencrypt/live/louisdebruijn.me/privkey.pem; # managed by Certbot
        include /etc/letsencrypt/options-ssl-nginx.conf; # managed by Certbot
        ssl_dhparam /etc/letsencrypt/ssl-dhparams.pem; # managed by Certbot
    }
    server {
        if ($host = www.louisdebruijn.me) {
            return 301 https://$host$request_uri;
        } # managed by Certbot

        if ($host = louisdebruijn.me) {
            return 301 https://$host$request_uri;
        } # managed by Certbot

          server_name louisdebruijn.me www.louisdebruijn.me;
        listen 80;
        return 404; # managed by Certbot
    }
Multiple services
Hosting multiple services with Gunicorn is possible. Currently I'm hosting a self-contained FastAPI project instance
and my personal website (Django) on the same DigitalOcean server.
Git clone a new project, create a separate virtual environment and set up a different
Gunicorn
gunicorn_api.socket
[Unit]
Description=gunicorn socket

[Socket]
ListenStream=/run/gunicorn_api.sock

[Install]
WantedBy=sockets.target
gunicorn_api.service
[Unit]
Description=gunicorn daemon
Requires=gunicorn.socket
After=network.target

[Service]
User=[***]
Group=www-data
WorkingDirectory=/home/[***]/spark-matcher-api
ExecStart=/home/[***]/spark-matcher-api-venv/bin/gunicorn app.app:app \
          --access-logfile - \
          --workers 1 \
          --bind unix:/run/gunicorn_api.sock \
          --worker-class uvicorn.workers.UvicornWorker

[Install]
WantedBy=multi-user.target
Follow these steps to enable your extra Gunicorn service files and create the symlink.
This will have created a
Test if the extra Gunicorn service runs with
Restart the extra Gunicorn service with
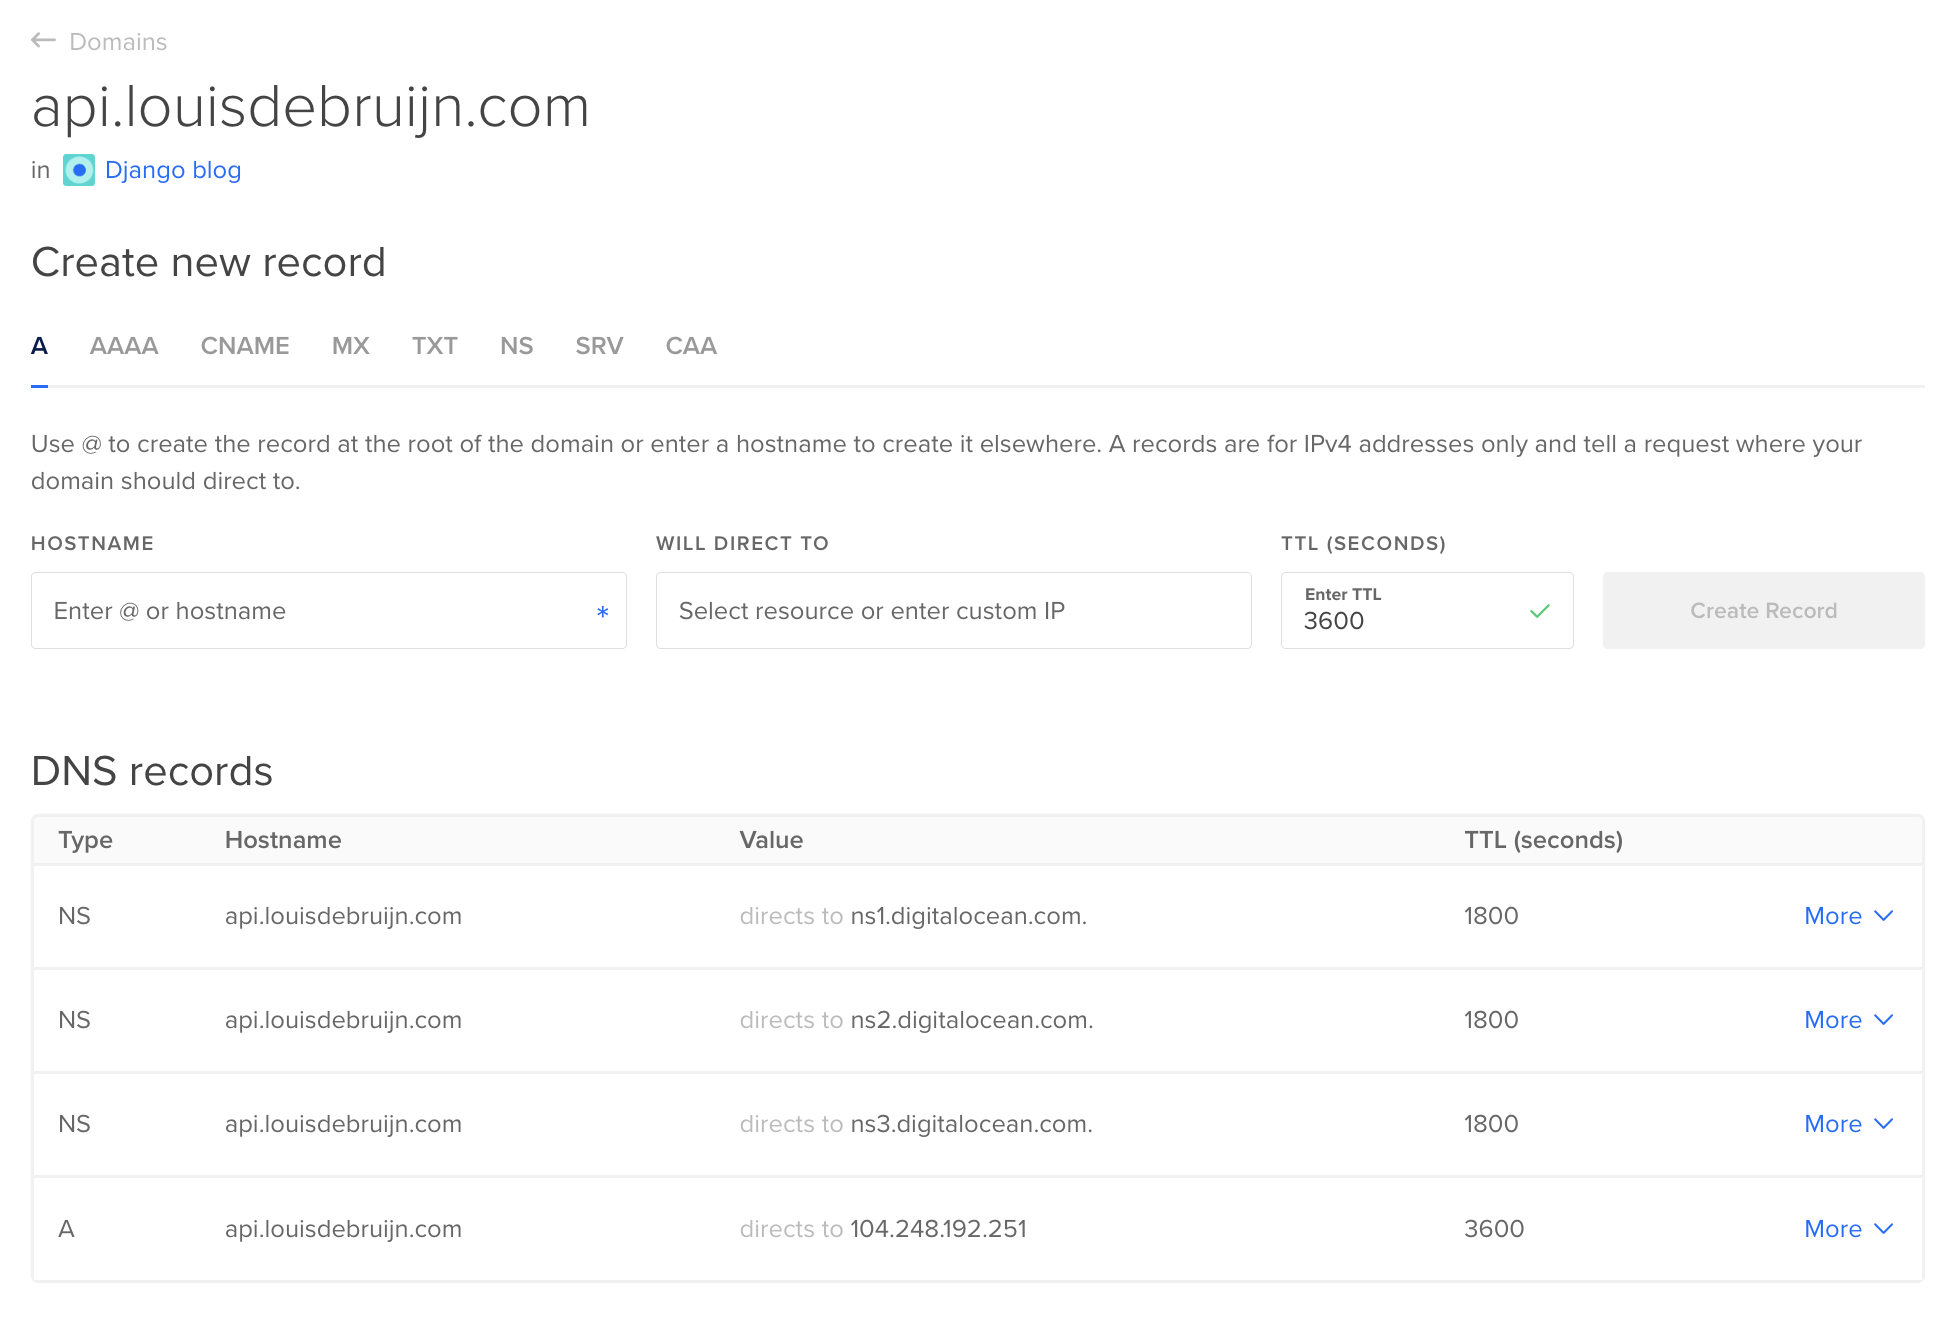
Next step is to create a new domain endpoint for this extra Gunicorn service. If you haven't done this, please see section Domain Name.
Below you can see the
sites-available/api.louisdebruijn.com
server {

      server_name api.louisdebruijn.com www.api.louisdebruijn.com;

      location / {
        include proxy_params;
        proxy_pass http://unix:/run/gunicorn_api.sock;
      }
}
Don't forget to create the symlink for this extra Gunicorn service. You will need to add the DNS servers under your new domain endpoint in your DigitalOcean project and certify this domain endpoint with Certbot too.
Domain name
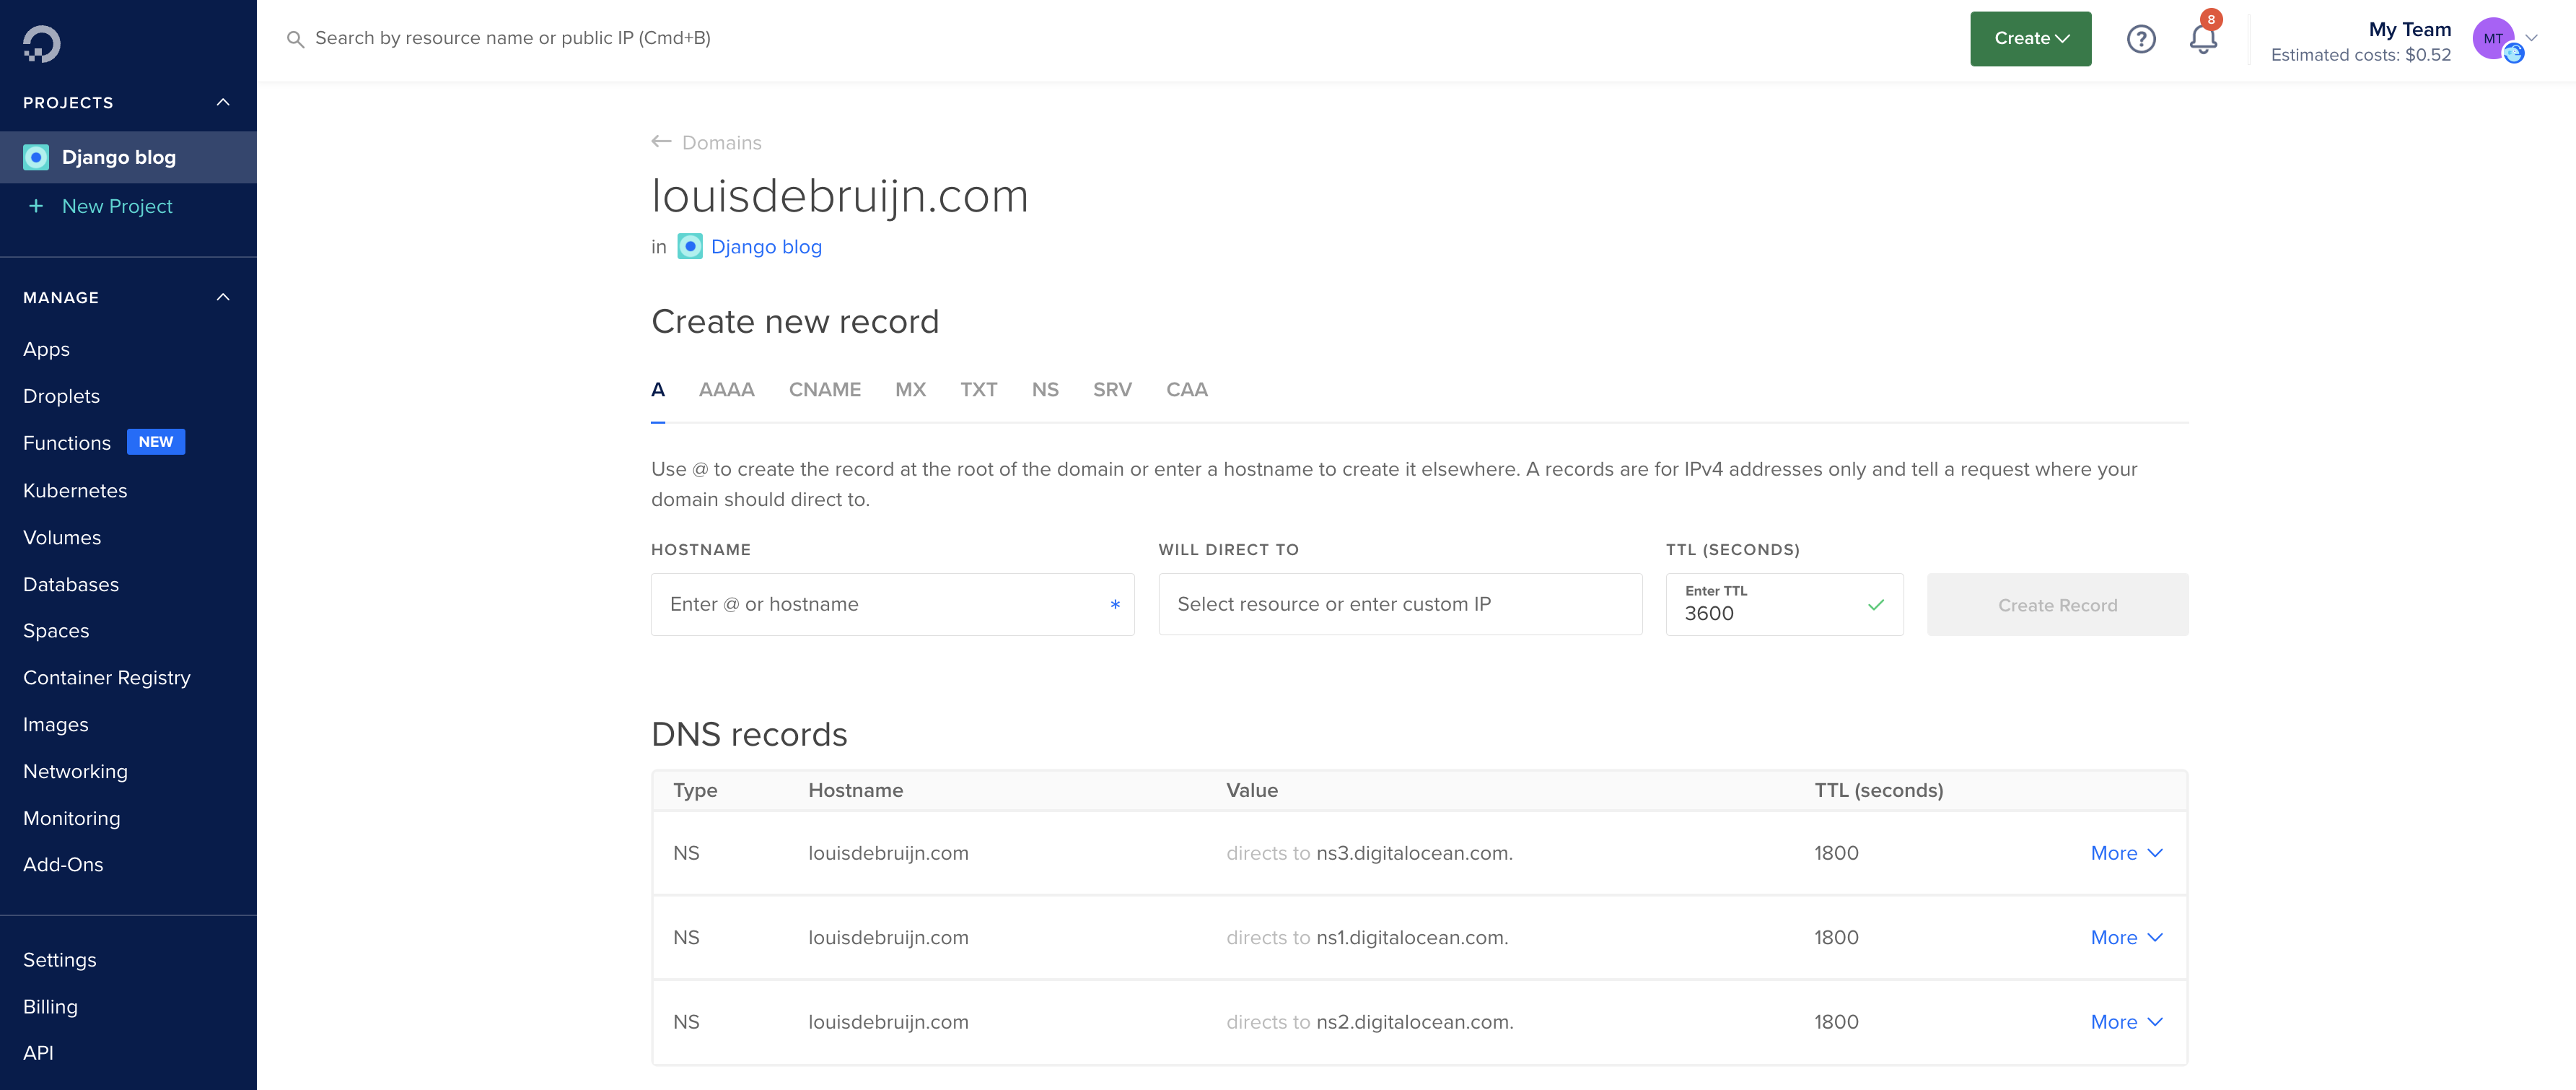
You can buy a domain name from any domain supplier. I bought mine at Namecheap as I found it to be the cheapest option. In your domain supplier's configurations you need to set a custom DNS to redirect the domain to Digitalocean. It can take up to 48 hours for these changes to be reflected.
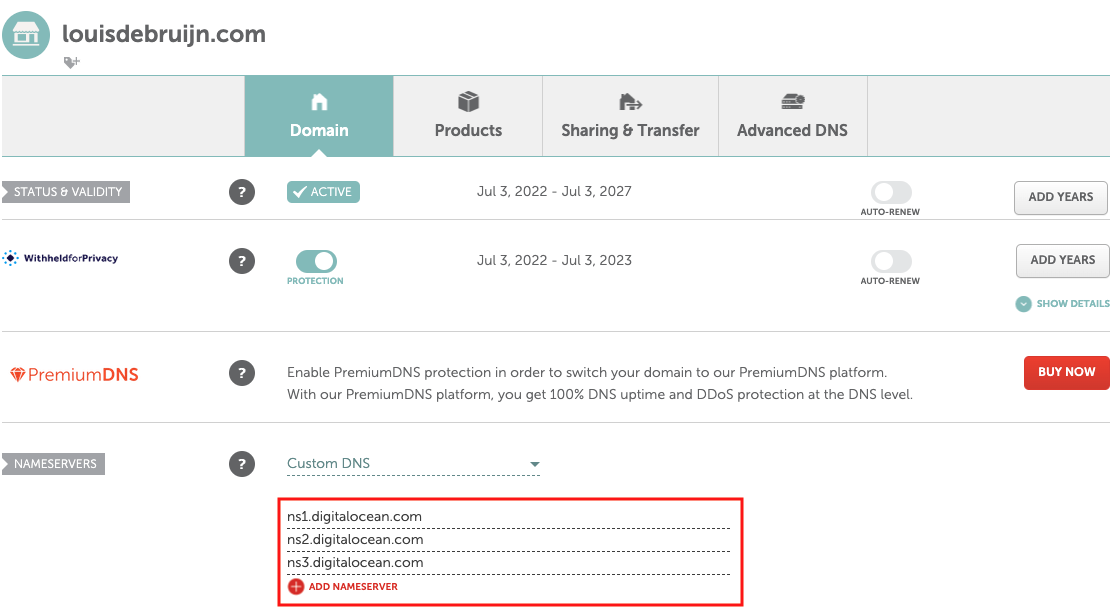
You can then add the domain to your project in Digitalocean.
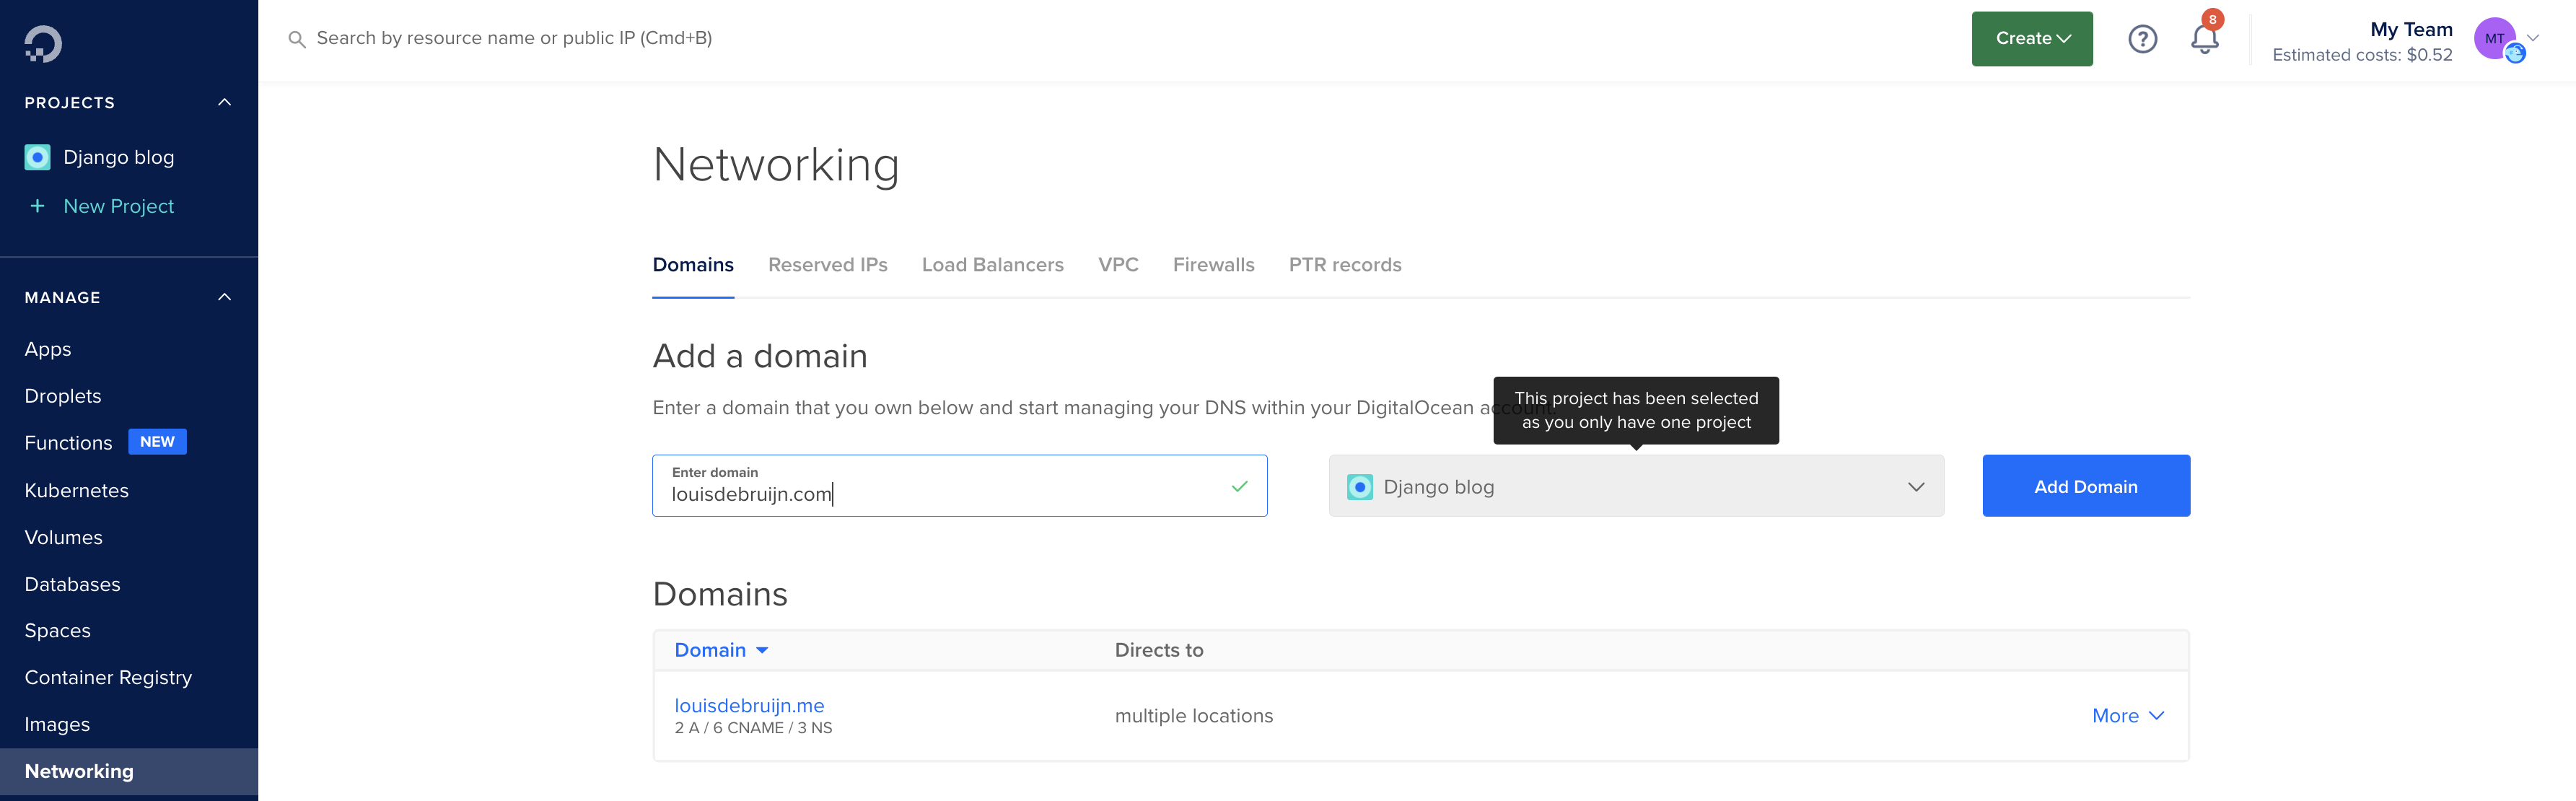
If everything went OK, you should see the three DNS servers under your domain name.
Certification
Next step is to take our domain and certify it and redirect all HTTP to HTTPS following the third and last tutorial
(3) Securing Nginx with Let's Encrypt
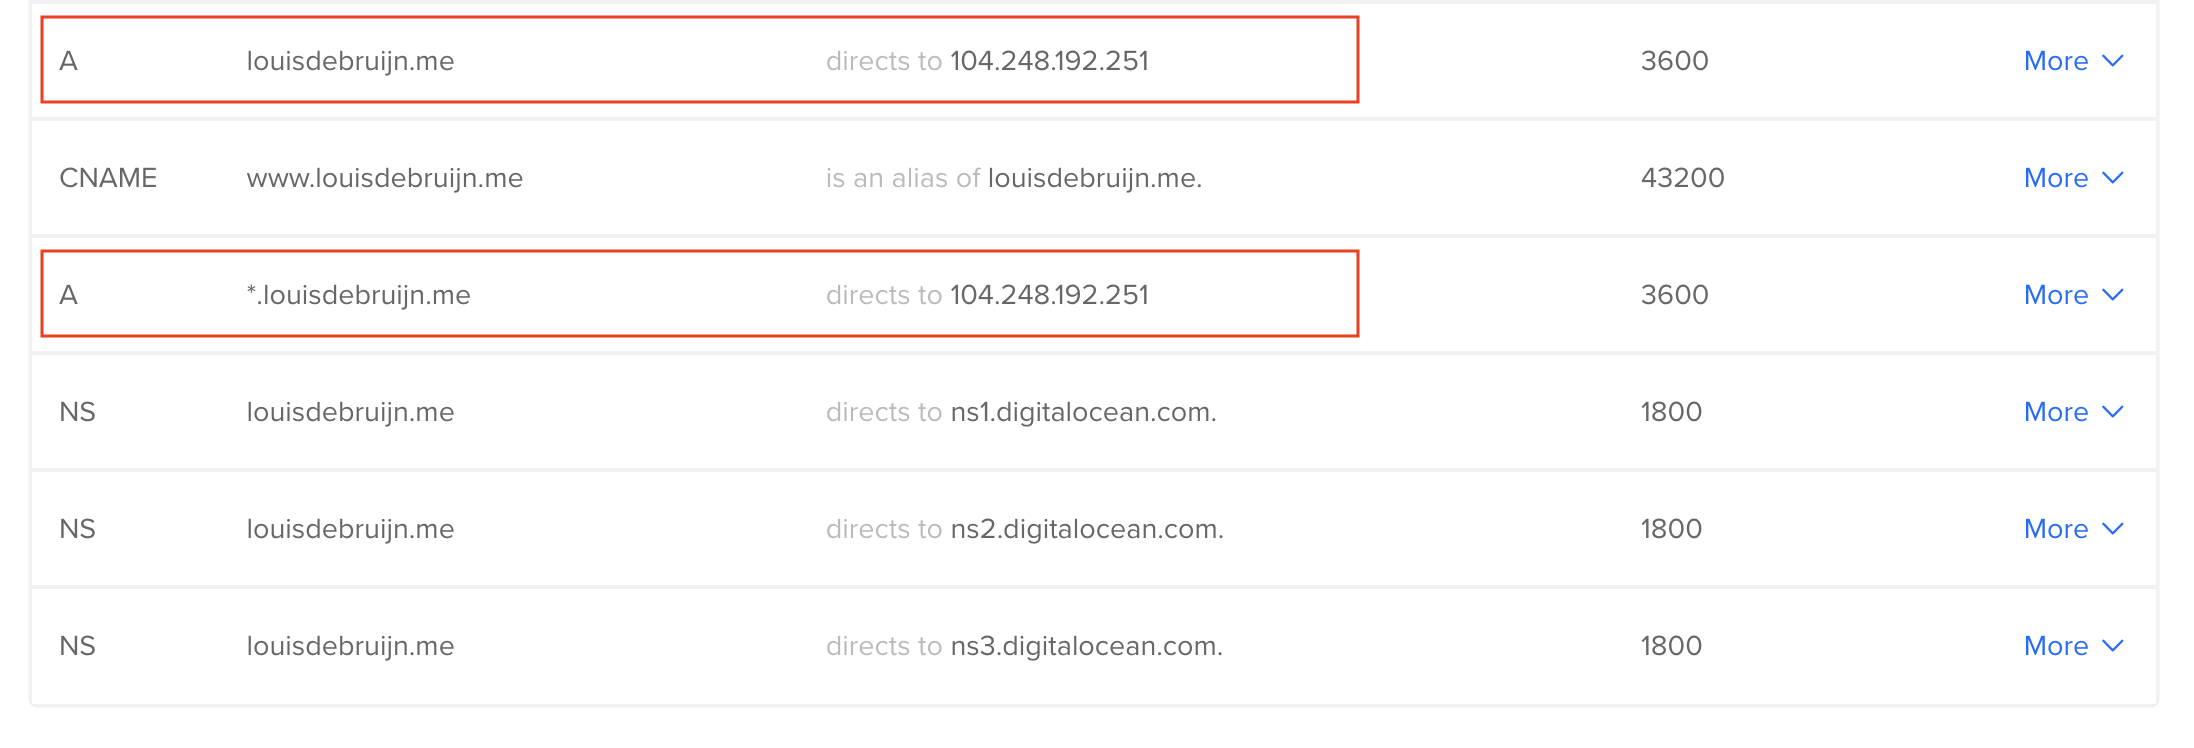
Important steps are to add an A record redirecting
Make sure to create a symlink from the
Also, try looking at the Nginx logs for debugging
Remove certificates with the following commands
Below you can find the sites-available for one of my domains. I've masked my username with
sites-available/louisdebruijn.com
server {
      server_name louisdebruijn.com www.louisdebruijn.com;

      location = /favicon.ico { access_log off; log_not_found off; }
      location /static/ {
          root /home/leddebruijn/personal_website/personal_website;
      }

      location / {
          include proxy_params;
          proxy_pass http://unix:/run/gunicorn.sock;
      }

    listen 443 ssl; # managed by Certbot
    ssl_certificate /etc/letsencrypt/live/louisdebruijn.com/fullchain.pem; # managed by Certbot
    ssl_certificate_key /etc/letsencrypt/live/louisdebruijn.com/privkey.pem; # managed by Certbot
    include /etc/letsencrypt/options-ssl-nginx.conf; # managed by Certbot
    ssl_dhparam /etc/letsencrypt/ssl-dhparams.pem; # managed by Certbot
}

server {
    if ($host = www.louisdebruijn.com) {
        return 301 https://$host$request_uri;
    } # managed by Certbot

    if ($host = louisdebruijn.com) {
        return 301 https://$host$request_uri;
    } # managed by Certbot

      server_name louisdebruijn.com www.louisdebruijn.com;
    listen 80;
    return 404; # managed by Certbot
}
Deployment checklist
Let's go over what is necessary to deploy your Django website when you update the code. Following the normal version control system you can create a new
Before following this checklist, make sure your /etc/conf/production_config.yml is up-to-date.
Did you recently add a new app? Make sure there is a
Open up the console with your SSH user
Debugging
Stuff breaking and no idea how to fix it? Find the Django logs with the first command below. Use it to see the logs and find the error breaking your page.
References
- Django documentation
- Github Personal Access Token (PAT)
- Digitalocean serving your PostgresSQL database
- Digitalocean serving your website with Nginx, Gunicorn
- Digitalocean introduction to Nginx
- Digitalocean DNS registration from domain providers
- Digitalocean Let's Encrypt HTTP to HTTPS
- Digitalocean DNS types